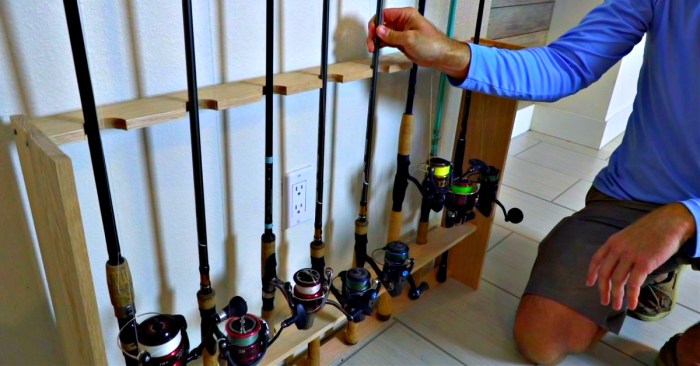
Fishing rod rack DIY projects are a fantastic way to organize your gear and save money. Instead of buying an expensive pre-made rack, you can create a custom solution that fits your space and needs. This guide will walk you through the process, from planning to construction, ensuring you end up with a functional and stylish fishing rod rack.
You’ll learn about different types of racks, the materials needed, and how to build a base and rod holders. We’ll also cover essential safety considerations and troubleshooting tips to help you avoid common mistakes. Whether you’re a seasoned angler or just starting out, this DIY project is a rewarding way to enhance your fishing experience.
Introduction to Fishing Rod Racks
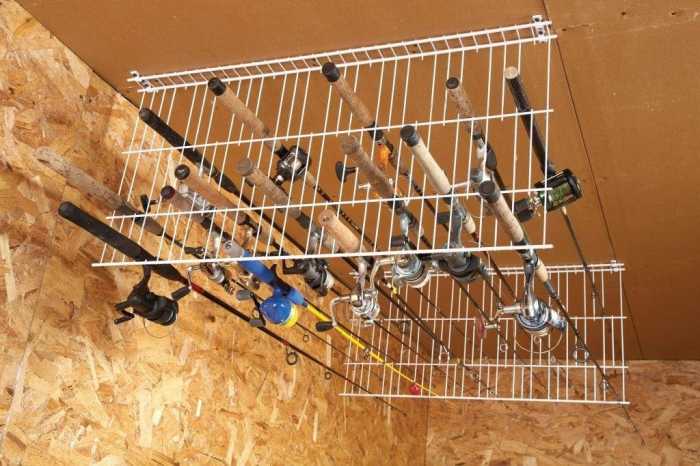
A fishing rod rack is a crucial component of any angler’s setup, providing a dedicated space for organizing and storing your fishing rods. It helps keep your rods protected, prevents damage, and ensures easy access when you’re ready to hit the water. While you can find pre-made fishing rod racks in stores, building your own DIY rack offers numerous advantages, including cost-effectiveness, customization, and the satisfaction of creating a unique piece for your fishing gear.
Types of Fishing Rod Racks
Fishing rod racks come in a variety of styles, each offering distinct benefits depending on your needs and preferences. Here are some common types:
- Wall-mounted racks: These are space-saving and ideal for smaller spaces. They can be mounted on walls, garage doors, or even inside your fishing boat. They typically feature vertical slots or hooks to hold the rods securely.
- Freestanding racks: These racks offer a more portable option and can be placed anywhere in your garage or fishing area. They often come with a base that provides stability and can hold multiple rods.
- Ceiling-mounted racks: These racks are excellent for maximizing floor space and keeping your rods out of the way. They typically hang from the ceiling and can be adjusted to accommodate different rod lengths.
- Rod holders: These are smaller, individual holders designed to secure a single rod. They are often used for storing rods temporarily or transporting them in a vehicle.
Planning Your DIY Fishing Rod Rack
Before diving into the construction process, it’s essential to plan your DIY fishing rod rack meticulously. This ensures the rack fits your needs and space perfectly.
Planning involves considering several factors, such as the available space, the number of rods to be stored, the desired materials, and the overall design.
Determining Space and Rod Capacity
The first step is to assess the space available for your fishing rod rack. Consider the dimensions of the wall, corner, or any other location where you plan to install the rack. Measure the width, height, and depth of the available space accurately. Once you have the dimensions, you can determine how many rods you can store comfortably.
Selecting Materials
Choosing the right materials is crucial for durability and aesthetics. Consider the following factors:
- Durability: Select materials that can withstand the weight of your fishing rods and the stresses of regular use. Wood, metal, and PVC are popular choices.
- Aesthetics: Consider the overall look of your fishing rod rack and how it will blend with your existing decor. Choose materials and finishes that complement your space.
- Cost: Set a budget for your DIY project and choose materials that fit within your price range.
Designing the Layout
Designing the layout involves considering the following:
- Rod Length: Ensure the rack is long enough to accommodate your longest rod. You may need to adjust the length of your rack based on the length of your rods.
- Spacing: Allow sufficient spacing between rods to prevent them from rubbing against each other and causing damage. A minimum of 2 inches between rods is recommended.
- Accessibility: Design the rack so that you can easily access all your rods. This may involve angling the rod holders or creating a tiered system.
Essential Materials and Tools
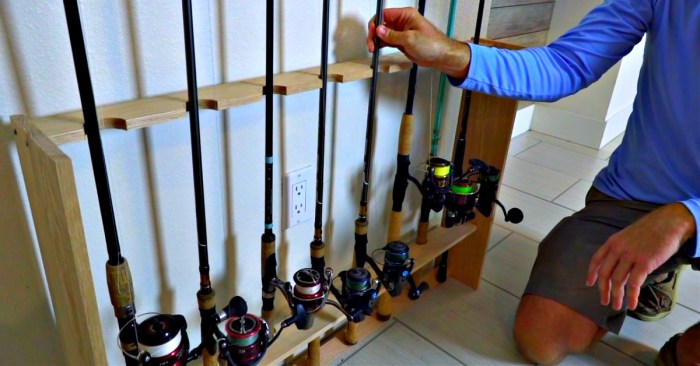
Building a fishing rod rack requires a combination of materials and tools to ensure a sturdy and functional structure. Choosing the right materials and tools will ensure a smooth construction process and a long-lasting rack.
Materials Needed
The materials required for your fishing rod rack depend on the design and size you choose. Here’s a general list of materials that are commonly used:
- Wood: The most common material for fishing rod racks. Pine, cedar, and redwood are good choices for their durability and affordability.
- Screws: Choose screws that are appropriate for the wood you’re using. Consider using wood screws for a secure hold.
- Brackets: Brackets are essential for supporting the rods and creating a secure hold. You can use L-brackets, shelf brackets, or specialized fishing rod brackets.
- Paint or Stain: To enhance the appearance and protect the wood, you can use paint or stain. Choose a finish that complements your decor and provides durability.
- Optional:
- Hardware Cloth: For a more secure grip, hardware cloth can be used to create a grid-like pattern on the back of the rack.
- Hooks: You can add hooks to the rack for hanging other fishing gear, such as lures or nets.
- Caster Wheels: If you want a portable rack, consider adding caster wheels to the base.
Tools Needed
You’ll need a few basic tools to construct your fishing rod rack.
- Saw: A circular saw or a hand saw will be needed to cut the wood to the desired dimensions.
- Drill: A drill with various drill bits is necessary for pre-drilling holes for screws and creating pilot holes for attaching brackets.
- Screwdriver: A screwdriver or a drill with a screwdriver attachment is needed to secure screws.
- Measuring Tape: A measuring tape is essential for accurately measuring the wood and ensuring precise cuts.
- Level: A level will ensure that the rack is straight and even.
- Sandpaper: Sandpaper is used to smooth out any rough edges on the wood.
- Safety Glasses: Always wear safety glasses when using power tools.
Preparing the Materials
Once you have gathered the necessary materials and tools, you can begin preparing them for construction.
- Cutting the Wood: Use a saw to cut the wood to the desired dimensions. Be sure to measure twice and cut once to ensure accuracy.
- Sanding the Wood: Sand the wood to smooth out any rough edges and prepare it for painting or staining.
- Finishing the Wood: Apply paint or stain to the wood, following the manufacturer’s instructions. Allow the finish to dry completely before proceeding.
Building the Fishing Rod Rack Base
The base of your fishing rod rack is the foundation of your project. It’s what provides stability and supports the rods. The construction of the base will depend on whether you’re building a freestanding rack or a wall-mounted one.
For freestanding racks, the base will typically be a rectangular or square structure made of wood or metal. For wall-mounted racks, the base is often a simple piece of wood or metal that is attached to the wall.
Constructing a Freestanding Base
Freestanding bases offer flexibility in placement and can be moved around as needed. Here’s a step-by-step guide to building a simple freestanding base:
- Cut the base pieces: Start by cutting the wood or metal for the base to the desired dimensions. For a rectangular base, you’ll need four pieces for the sides and two pieces for the top and bottom.
- Assemble the base: Using wood glue and screws, attach the side pieces to the top and bottom pieces to form a rectangular frame. You can use a miter saw for precise 90-degree angles.
- Add support: For added stability, you can add support pieces in the center of the base. These can be vertical or diagonal supports, depending on the size and design of your rack.
- Attach bracing: To prevent warping, you can attach bracing to the inside of the base. Bracing can be simple pieces of wood or metal that run across the base.
- Sand and finish: Once the base is assembled, sand down any rough edges and apply a finish, such as paint or stain, to protect the wood or metal.
Securing a Freestanding Base
To ensure stability, you can secure a freestanding base to the floor using:
- Heavy-duty casters: Casters provide mobility and can be locked in place for stability. Choose casters that are rated for the weight of your rack and rods.
- Floor anchors: Floor anchors are metal plates that are embedded in the floor and attach to the base. This is a more permanent solution that provides strong stability.
Constructing a Wall-Mounted Base
Wall-mounted bases are a space-saving option and can be a great way to display your rods. Here’s how to build a simple wall-mounted base:
- Cut the base piece: Cut a piece of wood or metal to the desired length and width for your base.
- Attach mounting brackets: Use wood screws or metal brackets to attach mounting brackets to the back of the base. Make sure the brackets are strong enough to support the weight of your rods.
- Secure the base to the wall: Use a stud finder to locate wall studs and mark the positions for the mounting brackets. Use appropriate screws or anchors to secure the base to the wall.
- Sand and finish: Sand down any rough edges and apply a finish to the base.
Creating the Rod Holders: Fishing Rod Rack Diy
The rod holders are the heart of your fishing rod rack, so it’s important to get them right. They need to be sturdy enough to hold your rods securely, yet flexible enough to accommodate different sizes and styles.
The way you attach the rod holders to the base is crucial for stability and durability. Here are some popular methods:
Methods for Attaching Rod Holders
The choice of attachment method will depend on the materials you’re using for the base and the type of rod holders you’ve selected.
Here are some common methods:
- Screwing: This is a reliable and straightforward method, especially for wood bases. You’ll need to drill pilot holes before screwing in the rod holders to prevent splitting the wood.
- Gluing: For lightweight rod holders and bases made from materials like PVC or metal, you can use a strong adhesive. Make sure to apply the glue evenly and clamp the rod holders in place until the adhesive sets.
- Clamping: If you want a more temporary solution, you can use clamps to attach the rod holders to the base. This method is ideal for testing different configurations before making permanent attachments.
Customizing Rod Holders
You can add a personal touch to your rod holders by customizing them to suit your specific needs. Here are a few ideas:
- Adding Hooks: Attach hooks to the sides or underneath the rod holders to hang fishing lures, pliers, or other accessories. This keeps your tools organized and within easy reach.
- Installing Shelves: For larger rod holders, you can add shelves for storing tackle boxes, reels, or other gear. This helps to keep your fishing equipment organized and protected.
Finishing Touches and Customization
Now that the structure of your fishing rod rack is complete, it’s time to add the finishing touches and personalize it to your liking. This stage is all about making your rack look great and function perfectly for your needs.
There are several ways to customize your fishing rod rack, from simple paint jobs to elaborate storage compartments. The possibilities are endless, and you can tailor the design to complement your fishing gear and your personal style.
Finishing Options
Finishing your fishing rod rack not only enhances its appearance but also protects it from the elements.
- Painting: A fresh coat of paint can transform your rack’s look. You can choose a color that complements your garage or workshop or matches your favorite fishing lures. Consider using a durable outdoor paint for added protection against scratches and moisture.
- Staining: Staining is a great option for highlighting the natural grain of the wood. Select a stain color that complements your fishing gear or matches your garage’s décor. Staining also provides a protective layer that resists moisture and UV damage.
- Protective Sealant: Applying a clear sealant, such as polyurethane or varnish, will protect your rack from water, scratches, and UV damage. It will also enhance the wood’s natural beauty and make it easier to clean.
Adding Decorative Elements
Decorative elements can add personality and functionality to your fishing rod rack.
- Labels: Add labels to your rod holders to identify specific rods or types of fishing line. You can use pre-made labels or create your own with a label maker or marker.
- Hooks: Install hooks on the sides of your rack to hang fishing tools, tackle boxes, or other accessories. Hooks can be a great way to keep your gear organized and within reach.
- Storage Compartments: Add small storage compartments or shelves to your rack to store fishing line, lures, or other small items. You can use wood scraps or pre-made storage boxes to create these compartments.
Customization Examples
Here’s a table with examples of various customization options for your fishing rod rack:
| Customization Option | Description | Example |
|---|---|---|
| Painting | Paint the rack a vibrant blue to match your favorite fishing spot. | A bright blue fishing rod rack that matches the color of the ocean. |
| Staining | Stain the rack a rich mahogany color to complement your wooden fishing tackle box. | A mahogany-stained fishing rod rack that matches the color of a wooden tackle box. |
| Protective Sealant | Apply a clear polyurethane sealant to protect the rack from moisture and scratches. | A fishing rod rack with a clear sealant that highlights the wood grain. |
| Labels | Add labels to the rod holders to identify different types of fishing rods. | A fishing rod rack with labels that say “Bass Rod,” “Trout Rod,” and “Fly Rod.” |
| Hooks | Install hooks on the sides of the rack to hang fishing tools and tackle boxes. | A fishing rod rack with hooks on the sides for hanging fishing tools and tackle boxes. |
| Storage Compartments | Add small storage compartments to hold fishing line, lures, and other small items. | A fishing rod rack with small storage compartments for holding fishing line, lures, and other small items. |
Safety Considerations
Building a fishing rod rack might seem straightforward, but safety should always be a top priority during construction and use. Taking the necessary precautions will ensure a sturdy and reliable rack that can hold your valuable fishing rods without posing any risks.
It’s essential to prioritize safety throughout the entire process, from selecting materials and tools to installing and using the rack. By following the safety guidelines, you can create a fishing rod rack that’s both functional and safe.
Using Appropriate Tools and Safety Gear, Fishing rod rack diy
Always use tools that are in good working condition and are appropriate for the task at hand. Wearing appropriate safety gear, such as safety glasses, gloves, and dust masks, can protect you from potential hazards during construction.
Here are some specific safety considerations:
- Power Tools: When using power tools like saws, drills, and sanders, ensure you are familiar with their operation and safety protocols. Always wear safety glasses and hearing protection to prevent injuries from flying debris or excessive noise.
- Hand Tools: Even when using hand tools, safety is crucial. Use tools that are in good condition, and avoid using tools for purposes they are not intended for. For example, use a hammer for hammering, not for prying.
- Materials Handling: When handling heavy materials, use proper lifting techniques to avoid strain or injury. Ask for help if you need it, and always use lifting aids if necessary.
Secure Installation and Weight Distribution
The stability of your fishing rod rack is paramount. Improper installation or uneven weight distribution can lead to the rack collapsing, potentially damaging your rods or causing injury.
Here are some tips for secure installation and weight distribution:
- Choose the Right Location: Select a location that can adequately support the weight of the rack and the rods it will hold. Avoid placing the rack on unstable surfaces or in areas prone to vibrations.
- Use Strong Mounting Hardware: Use high-quality mounting hardware that is appropriate for the wall material and the weight of the rack. Oversized screws or bolts provide additional stability and security.
- Even Weight Distribution: Ensure the weight of the rods is evenly distributed across the rack. Avoid overloading any specific area, as this can lead to instability and potential failure.
Testing the Stability of the Rack
Before using the rack to store your fishing rods, it’s essential to test its stability. This helps identify any potential issues or weaknesses before they lead to accidents.
Here’s how to test the stability of your fishing rod rack:
- Visual Inspection: Thoroughly inspect the rack for any signs of weakness, such as loose screws, cracked wood, or uneven mounting. If you notice any issues, address them before proceeding.
- Weight Test: Place a weight similar to the combined weight of your fishing rods on the rack. Apply pressure to different areas to check for any movement or instability. If you notice any movement, adjust the installation or consider using stronger mounting hardware.
- Dynamic Test: Gently shake or push the rack to simulate real-world conditions. This will help identify any potential issues with the rack’s stability. If you notice any movement or instability, further reinforce the installation or consider using a different design.
Alternative DIY Designs
You’ve already explored the basics of building a fishing rod rack, but what if you want something more unique or space-saving? This section delves into different DIY designs that cater to various needs and aesthetics.
Wall-Mounted Designs
Wall-mounted designs are popular due to their space-saving nature and ability to blend seamlessly with your existing decor.
- Simple Horizontal Rack: This classic design involves mounting a horizontal board with rod holders drilled into it. It’s straightforward to build and can be customized with different wood types and finishes. The horizontal design allows for easy access to your rods.
- Vertical Rack: A vertical rack saves space and creates a visually appealing display. This design uses a vertical board with multiple rows of rod holders. It’s ideal for storing a large number of rods in a limited space. The vertical design makes it easy to see and access all your rods.
- Angled Rack: This design features a slightly angled board with rod holders. The angle provides better visibility of the rods and prevents them from touching each other, minimizing scratches. It’s a practical and stylish option.
Freestanding Designs
Freestanding racks offer flexibility in placement and can be moved around as needed.
- A-Frame Rack: This design resembles an A-frame, with two vertical supports connected at the top. The frame can be made from wood or metal and provides a stable base for storing rods. The A-frame design is sturdy and can accommodate multiple rods.
- T-Shaped Rack: This design features a vertical support with a horizontal crossbar, resembling a T. It offers a simple and efficient way to store rods. The T-shaped design is easy to assemble and provides a stable base for your rods.
Creative Designs
Beyond the traditional designs, there are numerous creative options that can be customized to your preferences.
- Ladder Rack: Use an old ladder as a base and attach rod holders to the rungs. This design adds a rustic touch and can be repurposed from an existing item.
- Pallet Rack: Repurpose a wooden pallet into a unique rack by attaching rod holders to the slats. This design is budget-friendly and adds a rustic industrial feel.
Design Comparison Table
| Design | Image | Dimensions | Materials | Cost | Pros | Cons |
|---|---|---|---|---|---|---|
| Simple Horizontal Rack | [Image of a simple horizontal rack] | Variable, depending on the number of rods and space | Wood, rod holders | Low | Easy to build, customizable | Limited storage capacity |
| Vertical Rack | [Image of a vertical rack] | Variable, depending on the number of rods and space | Wood, rod holders | Moderate | Space-saving, visually appealing | May require more space for mounting |
| Angled Rack | [Image of an angled rack] | Variable, depending on the number of rods and space | Wood, rod holders | Moderate | Provides visibility and prevents scratches | May be more complex to build |
| A-Frame Rack | [Image of an A-frame rack] | Variable, depending on the number of rods and space | Wood, metal, rod holders | Moderate | Sturdy, can accommodate multiple rods | May take up more floor space |
| T-Shaped Rack | [Image of a T-shaped rack] | Variable, depending on the number of rods and space | Wood, metal, rod holders | Low | Easy to assemble, stable | Limited storage capacity |
| Ladder Rack | [Image of a ladder rack] | Variable, depending on the ladder size | Ladder, rod holders | Low | Unique, rustic | May not be as stable as other designs |
| Pallet Rack | [Image of a pallet rack] | Variable, depending on the pallet size | Pallet, rod holders | Low | Budget-friendly, industrial look | May require additional modifications |
Troubleshooting and Maintenance
While building and using your DIY fishing rod rack might seem straightforward, there are some common issues that could arise. Understanding these potential problems and their solutions can help ensure a smooth and enjoyable experience. It’s also crucial to establish a regular maintenance routine to keep your rack in top shape and extend its lifespan.
Common Construction Issues and Solutions
Here are some common problems you might encounter during the construction process and their respective solutions:
- Uneven Base: If the base of your rack is uneven, it can lead to instability and even damage to your rods. To address this, ensure the base is level before attaching the rod holders. You can use shims or adjust the base supports to achieve a level surface.
- Loose or Weak Connections: Loose screws or poorly glued joints can compromise the structural integrity of the rack. Always use appropriate screws, glue, and fastening techniques to create strong and durable connections.
- Incorrect Rod Holder Size: If the rod holders are too small, they might not securely hold your rods. Conversely, oversized holders can make it difficult to remove your rods. Measure your rods carefully and choose holders that fit snugly but allow for easy insertion and removal.
Maintenance Tips
To keep your fishing rod rack in optimal condition and extend its lifespan, follow these maintenance tips:
- Regular Cleaning: Dust, dirt, and debris can accumulate on your rack, especially if it’s stored outdoors. Regularly clean the rack with a damp cloth and mild detergent to remove dirt and grime.
- Inspecting for Damage: Look for any signs of wear and tear, such as cracks, loose screws, or damaged rod holders. Address any issues promptly to prevent further damage.
- Re-tightening Fasteners: Over time, screws and other fasteners can loosen. Periodically re-tighten all fasteners to ensure a secure and stable rack.
- Treating Wood: If your rack is made of wood, apply a sealant or stain to protect it from moisture, UV rays, and insects.
Maintenance Checklist
Here’s a simple checklist to guide your regular maintenance:
- Clean the rack with a damp cloth and mild detergent.
- Inspect for any signs of wear, cracks, or damage.
- Re-tighten all screws and fasteners.
- Apply a sealant or stain to wooden racks (if applicable).
- Check the rod holders for any signs of wear or looseness.
With a little planning and effort, you can create a durable and functional fishing rod rack that will keep your gear organized and protected for years to come. The satisfaction of building your own storage solution is unmatched, and the process itself can be a fun and rewarding experience. Remember to prioritize safety, choose quality materials, and enjoy the creative freedom that comes with a DIY project.
Building a fishing rod rack is a great way to keep your gear organized and accessible. If you’re looking for a more challenging DIY project, you could try building a diy rc airplane. Once you’ve mastered those skills, you’ll be ready to tackle any DIY project, including a fishing rod rack that will keep your rods in tip-top shape!

