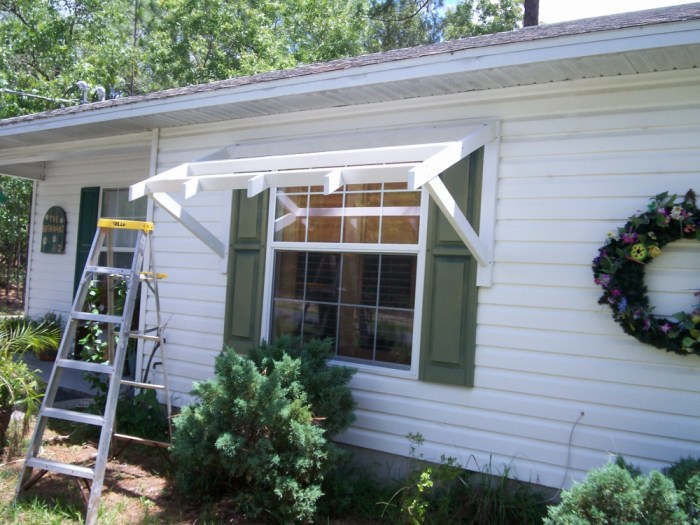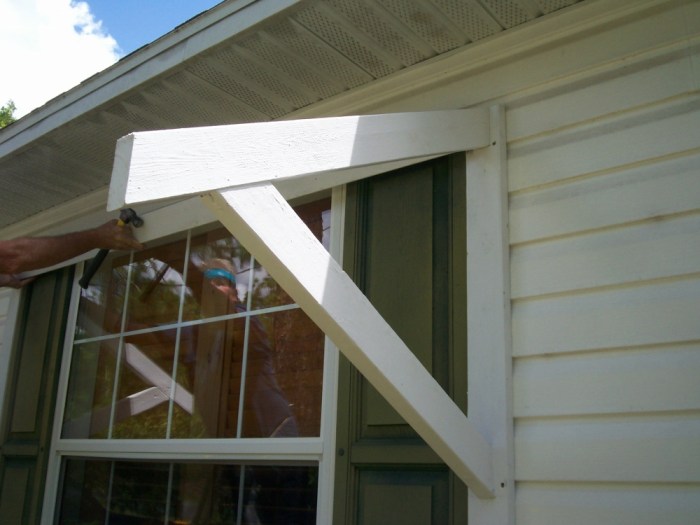
DIY window awnings offer a fantastic way to enhance your home’s curb appeal while providing shade and protection from the elements. These versatile structures can be customized to match your home’s style and enhance its overall aesthetic. Whether you’re looking for a simple, retractable awning or a more elaborate cantilevered design, building your own window awning can be a rewarding project.
This guide will walk you through the process of designing, constructing, and installing a DIY window awning. We’ll cover everything from choosing the right materials and tools to mastering the essential steps for a successful project. Get ready to transform your windows and add a touch of elegance to your home.
Materials and Tools for DIY Window Awnings

Constructing a DIY window awning requires a combination of materials and tools. The specific materials and tools needed will depend on the design and size of the awning. However, there are some common materials and tools that are essential for most DIY window awning projects.
Materials for DIY Window Awnings
Materials are the foundation of any DIY project, and choosing the right materials for your window awning is crucial for its durability, aesthetics, and functionality.
- Wood: Wood is a popular choice for the frame of a window awning. It is relatively inexpensive, easy to work with, and can be stained or painted to match the style of your home. Common choices include redwood, cedar, and pressure-treated lumber, known for their resistance to rot and decay.
- Metal: Metal, particularly aluminum, is another suitable option for the frame. It is lightweight, durable, and resists rust and corrosion. Aluminum can be easily cut and shaped, making it a good choice for intricate designs.
- Fabric: The fabric used for the awning canopy is essential for providing shade and protection from the elements. Consider factors like durability, water resistance, and UV protection when selecting fabric.
- Fasteners: Fasteners are crucial for assembling the awning frame and attaching the canopy. Choose sturdy screws, nails, or brackets depending on the materials used.
Types of Fabrics for Window Awnings
The choice of fabric for your window awning significantly impacts its performance and longevity.
- Acrylic: Acrylic fabrics are known for their durability, water resistance, and UV protection. They are a popular choice for window awnings as they are relatively inexpensive and easy to maintain.
- Polyester: Polyester fabrics are also durable and water-resistant, offering good UV protection. They are often blended with other fibers, like cotton, to enhance their breathability and comfort.
- Canvas: Canvas fabrics are known for their strength and durability. They are often used for outdoor awnings due to their ability to withstand harsh weather conditions. However, they require more maintenance than acrylic or polyester fabrics.
- Vinyl: Vinyl fabrics are highly durable and water-resistant, offering excellent UV protection. They are often used for commercial awnings due to their long lifespan and low maintenance requirements.
Tools for DIY Window Awnings
Having the right tools makes the construction process easier and more efficient.
- Measuring tape: Essential for accurate measurements of the window and awning frame.
- Saw: A circular saw or handsaw is necessary for cutting wood or metal for the frame.
- Drill: A drill with various drill bits is needed for drilling pilot holes and securing fasteners.
- Screwdriver: A screwdriver is needed for attaching fasteners.
- Level: A level ensures that the awning frame is installed correctly.
- Hammer: A hammer is useful for driving nails and securing the frame.
- Staple gun: A staple gun is needed for attaching the fabric to the frame.
- Safety gear: Safety glasses, gloves, and hearing protection are essential for protecting yourself during construction.
DIY Window Awning Installation Tips

Installing a DIY window awning is a great way to add shade, privacy, and curb appeal to your home. With careful planning and execution, you can achieve a professional-looking result that will enhance your home’s exterior.
Measuring and Marking
Before you begin installing your awning, you need to determine the exact location and dimensions for mounting.
- Measure the window opening: Use a tape measure to accurately determine the width and height of your window.
- Determine the awning size: The awning should be slightly wider than the window to provide adequate coverage. Consider the desired overhang and choose an awning size that complements the window’s dimensions.
- Mark the mounting points: Once you’ve decided on the awning’s position, use a pencil to mark the exact locations on the wall where the mounting brackets will be attached.
Drilling Pilot Holes
Drilling pilot holes is essential for ensuring a smooth and secure installation.
- Use a drill bit: Select a drill bit that is slightly smaller than the diameter of the screws you’ll be using to attach the brackets.
- Drill at the marked points: Carefully drill pilot holes at each marked location, ensuring they are deep enough to accommodate the screws.
- Avoid over-drilling: Be careful not to drill too deep, as this could damage the wall or weaken the mounting surface.
Using Appropriate Fasteners
Choosing the right fasteners is crucial for a secure and long-lasting installation.
- Consider the wall material: Different wall materials require different types of fasteners. For example, concrete walls require concrete anchors, while wood walls can use standard screws.
- Use high-quality fasteners: Opt for fasteners that are made from durable materials like stainless steel or galvanized steel to resist rust and corrosion.
- Ensure proper length: Choose fasteners that are long enough to penetrate the wall material sufficiently and provide a secure grip.
Aligning the Awning
Proper alignment is essential for a visually appealing and functional awning.
- Use a level: Before attaching the awning brackets, use a level to ensure they are perfectly horizontal and aligned with the window opening.
- Adjust as needed: If necessary, make minor adjustments to the bracket positions until they are level and aligned.
- Securely fasten: Once the brackets are properly aligned, use the appropriate fasteners to attach them to the wall.
Stability and Support
A sturdy awning requires adequate support to withstand wind and other external forces.
- Check the brackets: Ensure that the awning brackets are strong and securely attached to the wall.
- Consider additional support: If the awning is large or exposed to strong winds, you may want to install additional support structures, such as vertical posts or braces.
- Test for stability: After installation, gently test the awning’s stability by applying a slight force to the structure. If it feels secure and stable, you can rest assured that it is properly installed.
Creative DIY Window Awning Ideas
A DIY window awning can be a simple and inexpensive way to add shade, style, and curb appeal to your home. You can create a unique and eye-catching awning by experimenting with different materials, styles, and decorative elements. Here are some creative DIY window awning ideas to inspire your next project.
Utilizing Recycled Materials
Using recycled materials can be a budget-friendly and eco-conscious way to create a unique window awning.
- Wooden Pallets: Wooden pallets can be easily disassembled and repurposed into a stylish awning. You can use the planks to create a simple frame and then cover it with fabric or metal sheets.
- Old Doors: If you have an old door lying around, it can be transformed into a charming awning. You can paint it, add decorative elements, or leave it in its natural state for a rustic look.
- Recycled Plastic Bottles: You can create a unique and sustainable awning by weaving recycled plastic bottles together. This is a great way to reduce waste and add a touch of eco-friendliness to your home.
Adding Decorative Elements
Adding decorative elements to your DIY window awning can make it a focal point of your home’s exterior.
- Trellis: A trellis can add a touch of elegance and provide a support structure for climbing plants. You can attach the trellis to the awning frame or use it as a decorative element on the awning itself.
- Fabric: You can choose from a variety of fabrics for your awning, including canvas, cotton, or even burlap. You can also add patterns, textures, or embroidery to personalize your awning.
- Lighting: Adding string lights or lanterns to your awning can create a cozy and inviting ambiance. You can use battery-operated lights for convenience or hardwire them for a more permanent installation.
Integrating with Existing Landscaping
Integrating your DIY window awning with your existing landscaping can create a cohesive and stylish outdoor space.
- Matching Colors: Choose awning colors that complement the colors of your house, landscaping, or outdoor furniture.
- Climbing Plants: Encourage climbing plants to grow up the awning frame or along the sides for a natural and lush look.
- Water Features: If you have a water feature near your window, consider incorporating it into the design of your awning. For example, you can use a water fountain as a focal point or add a small pond to create a tranquil atmosphere.
With a little planning, the right materials, and a touch of creativity, you can build a DIY window awning that not only enhances your home’s exterior but also provides a practical and stylish solution for your windows. From the initial design to the final installation, this guide equips you with the knowledge and confidence to tackle this rewarding project. So, gather your tools, choose your materials, and embark on a journey to create a window awning that perfectly complements your home.
A DIY window awning can provide shade and privacy to your home, and it’s a great way to enhance your curb appeal. If you’re looking to create a similar outdoor haven for your patio, consider building a DIY patio screen. These screens can offer protection from the elements and create a cozy, inviting space for relaxation and entertaining.
Both DIY window awnings and patio screens are relatively simple projects that can be completed with basic tools and materials.


